TI:ME Free Online Symposium is Happening NOW

TI:ME Members and non-members alike can logon to check out our free Symposium on Music Tech Pedagogy that is happening right now.  I’ll be speaking at 3:00pm EDT about the types of projects I like to teach and the methods I use to teach composition to kids with little or no music experience.

I’m absolutely thrilled to be a part of this – it’s an honor to be in such great company.  A quick rundown of the participants today:

Jay Dorfman – TI:ME’s national president and all around great guy from Boston U.

Mike Medvinsky – a former electrical engineer turned music teacher, who has in middle school kids making some cool things and really maker-faire kind of stuff

Bill Bauer – Bill used to serve on the Ohio TI:ME board before moving to sunny FL.  He’s one of the smartest and most earnest people in the field, and his research into music learning methods in the digital age are second to none.

The other two speakers, Chris and Adam, I don’t know as well but I wouldn’t be surprised if their accomplishments are right up there with the others.  Be sure to log on today to check out what’s going on right now in our field.

From One Clip, Many (Beginner-level House Music in Session View)

In my beginner Music Tech class we’re currently working on House music in Ableton’s Session View.  A key component of the project is generating tons of descendent clips from one original clip.  The idea was originally to use an old technique as inspiration – the TB-303 bass machine.

In the 1990’s, a lot of electronic music was very repetitive, and changed timbre more than it did notes or rhythmic material.  This is because those patterns were tougher to change and generate than the timbre changes one could accomplish by turning a knob.

This is also the first project we make in Session mode.  I want this strange-looking view to feel accessible and uniquely useful, so clip duplication is a pretty good starting point.

In our song, we start with a very simple bass pattern.  I like to use the opportunity to show what a monophonic instrument is and how the notes interrupt each other rather than playing chords.  In our example, the students generate the part by locating two octaves of a note with our left index finger and right index finger.  When we press the circle to record a clip, we “park” our left hand on the lower note, leaving it unchanged while simultaneously “interrupting” it with the higher note.  To create more interest, we allow the higher note to drift a bit to nearby keys.  After a quick quantize (cmd-U) the result is a cool alternating bass pattern.

Screen Shot 2014-10-08 at 11.29.06 AM

I then have students add more instrument tracks to the set – one of each synth category (Pad, Keys, Lead, Rhythmics, etc).  We then copy the initial bass recording onto the other tracks.  Each time we will adjust the octave (in the Notes box, simply type “+12” until it’s in a good sounding octave for that instrument).  After a few other steps involving form sections the Session view ends up looking like this.  Notice – the red clips are all the same exact clip, possibly octave shifted.  There are also drum clips and sound effects to help with transitions between scenes.

Screen Shot 2014-10-08 at 11.29.10 AM

When the song sections start coming together, we record the song scene-by-scene into the Arrangement view as a linear, finished song.

This long tone bass part translates to a big variety of sounds when placed on other instrument tracks.  Some things the students learn all in one shot with this project:

  • How MIDI clips are portable between instrument tracks
  • How Instrument timbre affects the sounds of notes, even if the notes are exactly the same
  • How to economically write a full song without needing to generate lots of original music beyond the original keyboard recording

Those are just the technical skills though – the real fun of this project is learning about House music and how to build up and drop and all that fun stuff.  Here’s what the finished project sounds like.

Keep in mind this is a project for beginners who have only been making music for about 8 weeks, and it totally works.  Let me know what you think!

Teaching Chord Progressions with Ableton and Hooktheory

When teaching composition, it used to be that writing chord progressions required:

  • Ability to play an instrument
  • Ability to read music notation
  • Knowledge of scales/chord positions on a piano
  • A few years of music theory/counterpoint lessons

When popular music learning became a thing in the 20th century, many guitarists figured out that they could:

  • Learn guitar
  • Get the basic set of chords down (G, C, D, D7, e min, etc.)
  • Use a capo to change keys
  • Swipe chord progressions from songs they already knew to write new ones

In my Music Technology classes, we condense this further:

  • Learn Ableton Live & apply scale/chord MIDI effects
  • Look up chord progressions to existing songs

Before we get to the method, allow me to address the purpose of this.  Yes, we miss out on the confidence that comes with several years of piano or guitar training, but we do get to have the experience of writing and manipulating chord progressions in a way that simply was not possible before these tools existed.  In the same way that computer animators may not need to master cel painting and “in-betweeners”, we do not need to learn the legacy techniques to be able to produce relevant and interesting chord patterns.

How it works

In a given project, we’ll start with a piano track.  I introduce this to my students during the Chiptune project, but it could be done at any time in your curriculum.

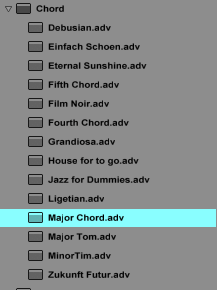
First, we’ll apply the MIDI Effect “Major Chord”.  Don’t worry if you actually plan to play in a Major key, we just need to split the incoming notes into a Triad.  If you play notes, you’ll hear “dumb” major chords that are chromatic, out of key, and always major.

Screen Shot 2014-10-06 at 7.30.25 PM

Next, and importantly after adding this we will add the MIDI Effect “Scale”.  Pick whichever preset you like – I’m going to choose Minor.  There’s a lot of minor music out there and we always teach it as a secondary thing.  In my class, we flip that – I almost always have them write in minor.

Screen Shot 2014-10-06 at 7.33.18 PM

Now we have pretty close to perfect diatonic chords.  There are a couple exceptions, including no leading tones for this natural minor scale.  No problem – we can still get good results here, voicing aside.

Realize this: you now have a piano that, instead of playing chromatic notes, has white keys that directly correspond to Roman Numeral analysis of chords.  You don’t have to just do it in C or G, you can do this in any key you want (just use the transpose dial on the Scale effect).  The first key gives you a I chord, the second key gives you a ii chord, the fifth key gives you a V chord.  Pretty cool, right?

Now we open Hooktheory.com, specifically the TheoryTab section.

Screen Shot 2014-10-06 at 7.37.33 PM

When you search for a given song, it will simply show you Roman numerals for the chords.  Each student can either play the chords as written, or simplify the pattern (with students who find the actual rhythms elusive, I say just make each chord 1 measure long).  Then, they record themselves playing those keys on their MIDI keyboards.

The great part about this is that the MIDI clip is very portable to other types of tracks.  The initial track is block chords, but adding an arpeggiator yields a cool background effect part.  Taking chord away and transposing down yields a good instrument for bass parts.  Add arpeggiator to a non-chord part to have a rhythmic bass line or background part.

Below is an example Chiptune project from a student written using this method.  Listen for all of these types of parts, plus a melody part (also made using the Scale MIDI effect).

Try this on your own students and let me know what you think!

How I teach mixing to high schoolers

I’ve been teaching Mixing and Mastering as an early project in my advanced Music Tech course for about 6 years, and I’ve found it to be one of the more challenging and rewarding parts of the curriculum.  It’s easy to pick an assignment that is either too hard or too simple, and ignore the practical elements of mixing.

Somewhat controversially, I teach mixing using Ableton Live.  I do this because I like using this software.  Specifically, I feel that track groups are a superior tool for a beginner compared to auxiliary sends.  Since Ableton can do both (and most other programs only use aux sends) I prefer using Live.

The process

For this project, I use a “raw” Recording Club project – that is, one with all the multi tracks recorded but no mixing applied to it.  To keep the project organized, I have pre-organized the set into Drum, Guitar and Vocal groups.

We start with the Guitars.  In our set, the guitars were recorded D.I. style – no amps of any kind were applied.  This frees us to pick the guitar sounds using Ableton’s Amp and Cabinet effects.  We spend a day learning about what different combinations of amp and cabinet sound like and apply them to our tracks.  We also apply high-pass filters to both guitar parts and compress the Guitar track group.

Next, we mix the vocals.  Using only the track group (the sub-tracks represent individual takes) we apply a high-pass filter, compression, simple delay (time-based to about 100ms with about 20% dry/wet), reverb, and possibly overdrive/saturator to get a “live” Rock sound.

Then, we mix the drums.  Because drums are the trickiest to mix I teach drum replacement for the kick and snare tracks.  Using Ableton’s “Convert Drums to new MIDI track” feature we isolate the snare and kick notes and replace those notes with a superior drum sound.  We then turn down the cymbal overheads and compress the Drums track group.

After applying a final mix among the three groups, we apply Full Chain Master to the master track to get the track up to standard volume levels.  To test the master quickly, we simply play our song at the same time a track from iTunes (at full volume) of the same style is playing.  If we can hear both at the same time and with the same basic frequency content, we’re good to go.

Unpacking the process

So, my readers may be in two camps over this project.  One camp is frothing at the mouth over my oversimplification of the mixing process.  To those, I apologize – I have attempted in the past to further explore the nuance and personal choice a true engineer experiences and it complicates the project too much for the average student trying to keep up.

To mention the point of drum replacement specifically – I do demonstrate how proper recording, mic choice, placement, and room can influence a drum sound.  Then I conclude that we do not have the proper environment to achieve this without doing human single-drum overdubs, which are simply not in our league.

Another camp may be wondering how I’m teaching mixing at all, and where I got these multitrack recordings from – simply put, it took a lot of time to collect material that works for this project.  I’ve tried songs from classes I have taken as well as ones I have helped record and mix, and right now the track included in this post is doing the trick.  This is the only project I do where the students all work on the same exact song, and it amazes me how differently the tracks can turn out.

How it turns out

Here’s how the track sounds when they start:

Here’s the example that I mixed along with the students – not perfect, but I don’t think it sounds too shabby.  Loud drums, live vocals, and nice sounding guitars:

And now for a couple students’ versions – first, one with the very common issue of the voice sitting too loudly in the mix:

And another common problem, the voice sitting to soft in the mix:

This one sounded like a fairly good mix, although the voice could use a little bit more effect – compared to the rest of the track it sounds raw.  I love the Dick Dale-style guitar delay.  Overall pretty good though:

And finally, what happens when drum replacement goes wrong.  Basically what you’re hearing is a Drums-to-MIDI track made from an overhead track rather than a spot mic track.  Also, the student used the default 808 drum kit sounds, rather than a suitable replacement:

Moving ahead with mixing

Even though my advanced Music Tech class is not all about mixing and recording, doing this project immediately makes students more sensitive to the ideas of balance, mastering and complex effect chains.  Of course, before doing this project we have to cover dynamic processors (gate, compressor, etc.) pretty extensively – it would be a lot to introduce those concepts along with the mixing issues.

I have noticed that the earlier I put this project and the more thoroughly we produce these mixes, the better subsequent projects sound.  Mixing a typical rock song actually opens students to making more complex and detailed electronic music, and allows them to explore the possibilities of the effect chain and track groups.

Download

Click here to download the Ableton Packs for the unmixed version and my mixed example version.  These use effects that require Ableton Live 9 Suite edition.

Unmixed version
Mixed version

Interactive Composition: The Book

I have a book coming out in February, co-authored with the illustrious VJ Manzo, called Interactive Composition: Strategies Using Ableton and Max for Live.

VJ and I have been working together for years to try to quantify and transcribe the way that music is being written today.  Our work continues, and our shared passion could be described as defining the methods that modern musicians are using to write popular music.

If you want to learn how to use Ableton Live to make the sorts of music that Ableton Live users make, Interactive Composition is your starting point.  It’s both a book of tutorials as well as a snapshot of electronic dance music and production styles and culture.  Look for mini-versions of lessons from the book in the months leading up to its release on this page.  The book contains 11 amazing projects and many more techniques and sub-projects to explore in your classes or personal work.  Each project is dense with techniques like synth-building, patch programming, sampling methods, and more.

In the meantime, check out the amazing cover design job by Oxford University Press:

Screen Shot 2014-09-28 at 9.01.42 PM

(For those asking: the subway map on the cover recalls both the visual nature of Max for Live patches as well as the vertical & modular nature of the interactive composition process, as well as reminding us of how cool subways are).

The book won’t be released until February, but you can pre-order it on Amazon, Barnes & Noble, Books-A-Million and direct from Oxford University Press.

Buy a set for your class today!